A security toll gate is a checkpoint or control point to manage access to a secure area or system. The security toll gate can take many forms, from physical gates or barriers to electronic systems requiring authentication and authorization. The purpose of a security toll gate is to provide an additional layer of security to protect against potential threats and help maintain the integrity and confidentiality of the protected area or system. Effective security toll gates protect against cyber-attacks, data breaches, and other security threats.
In this blog, we will discuss about how to build an effective security toll gates for Azure and on-premises resources.
Business Scenario:
Let's consider a scenario where a customer has infrastructure on Azure and on-premises, and they want to deploy a solution around threat protection, prevention of attacks, and monitoring their hybrid infrastructure.
Business Challenges: Below are some of the business challenges customers want to solve.
- Monitoring telemetry from diverse on-premises and Azure resources.
- Threat protection for Azure workloads and on-premises.
- Difficult to detect, hunt, prevent, and deliberate attacks and threats across the enterprise.
- Collect monitoring data from VM workloads in Azure, on-premises, and Store Logs in a central location.
Solution Strategy:
Recommended Architecture
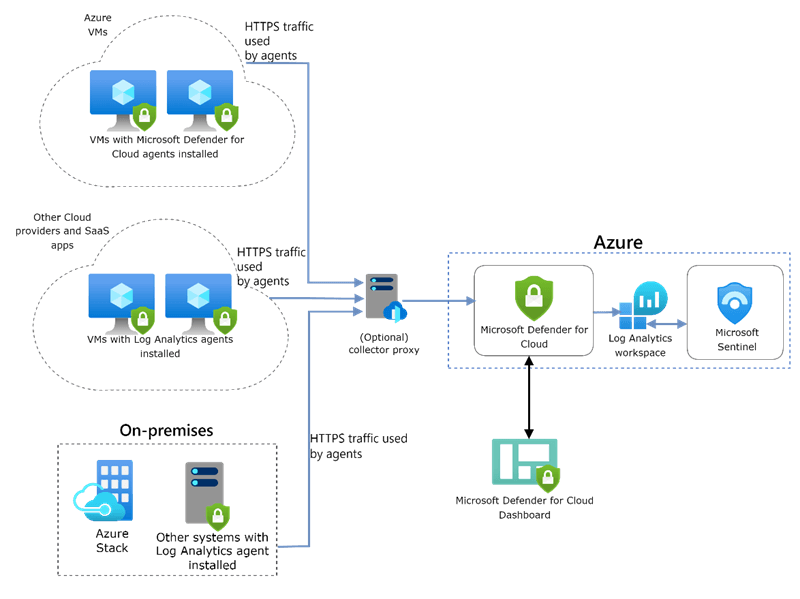
- Deploy Log Analytics workspace to collect the monitoring data from workloads in Azure and On-premises.
- Sign in to the Azure portal with Security Admin privileges.
- Create a Log Analytics workspace in the desired subscription, Resource Group, and location.
- Named it DFC-Sentinel-LAW to identify it easily.
- Enable Defender for Cloud
- Sign in to the Azure portal with Security Admin privileges.
- Select Defender for Cloud in the panel.
- Upgrade Microsoft defender for the cloud, on the Defender for cloud main menu, select getting started.
- Select your desired subscription and log the analytics workspace we created, “DFC-Sentinel-LAW,” from the drop-down menu.
- In the Install Agents dialog box, select the install agents button.
- Enable automatic provisioning, and Defender for cloud will install the Log Analytics Agent for Windows and Linux on all supported Azure VMs.
Note: We strongly recommend automatic provisioning, but you can manage it manually and turn off this policy.
- Enable Microsoft Defender for monitoring the on-premises workloads.
- On the Defender for Cloud - Overview blade, select the Get Started tab.
- Select Configure under Add new non-Azure computers and Select your Log Analytics workspaces.
- Select the log analytics workspace and download the agent from the direct agent blade.
- Copy Workspace ID and Primary Key and keep it in a safe place.
- Use Workspace ID and Primary Key to configure the agent.
- Install the Windows agent.
- o Copy the file to the target computer and then Run Setup.
- o Select agree on the license, Next.
- o Keep the default installation folder on the Destination Folder page and then select Next.
- o On the Agent Setup Options page, choose to connect the agent to Azure Log Analytics and then select Next.
- o On the Azure Log Analytics page, paste the Workspace ID and Workspace Key (Primary Key) that we copied into Notepad in the previous steps.
- o Select the Azure Commercial from the drop-down list.
- o After you provide the necessary configuration settings, select Install.
- o Agent gets installed on the target machine.
Note: If you have a proxy server in your environment, go to the Advanced option and configure the proxy server URL and Port number.
- Install the Linux agent.
- On your Linux computer, open the file that you previously saved. Select and copy the entire content, open a terminal console, and then paste the command.
- Once the installation finishes, you can validate that the omsagent is installed by running the pgrep command. The command will return the omsagent process identifier (PID). You can find the logs for the agent
at: /var/opt/microsoft/omsagent/"workspace id"/log/.
- Enable Defender for Cloud monitoring of Azure Stack VMs
- Sign into your Azure Stack portal.
- Go to the Virtual machines page and select the virtual machine you want to protect with Defender for Cloud.
- Select Extensions and click Add. It displays the list of available VM extensions.
- Select the Azure Monitor, Update, and Configuration Management extensions, and then Create.
- On the Install extension configuration blade, paste the Workspace ID and Workspace Key (Primary Key) that you copied into Notepad in the previous steps. Once the extension installation completes, It might take up to one hour for the VM to appear in the Defender for Cloud portal.
- Enable Microsoft Sentinel
- Sign in to the Azure portal, Search for Microsoft Sentinel, and select.
- Select Add, and on the Microsoft Sentinel blade, select Defender for Cloud-Sentinelworkspace.
- In Microsoft Sentinel, select Data connectors from the navigation menu.
- From the data connectors gallery, select Microsoft Defender for Cloud, and select the Open connector page button.
- Under Configuration, select Connect next to the subscription you want alerts to stream into Microsoft Sentinel.
- The Connect button will be available only if you have the required permissions and the Defender for Cloud subscription.
- After confirming the connectivity, close the Defender for Cloud Data Connector settings and refresh.
- It will take some time to sync the logs with Microsoft Sentinel.
- Under Create incidents, select Enabled to turn on the default analytics rule that automatically creates incidents from alerts. In the Active rules tab, you can then edit this rule under Analytics.
- To use the relevant schema in Log Analytics for the Microsoft Defender for Cloud alerts, search for Security Alert.
Outcome & Benefits:
- Consolidated monitoring solution for On-premises and other cloud resources.
- Security incident monitoring by Azure defender service proactively.
- End-to-end visibility of the organization's security-related posture.
- Detect, hunt, prevent, and respond to threats-based solutions across the enterprise.

Ratnadeep Sawate
Azure Infrastructure Architect